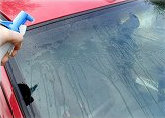
Firstly ensure that the glass is clean, (free from dust, wax, grease etc.), and try to avoid working in extremely hot or cold temperatures. If large vinyls are to be fitted, it may help if two people work together.
You can either fit the vinyl wet or dry, (see below.) Wet application should mainly be used on larger items, or if you are new to the process. (The water helps to make repositioning easier.) Dry application is quicker, but much more care must be taken to avoid air-bubbles etc appearing in the vinyl.
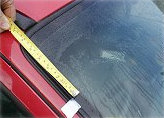
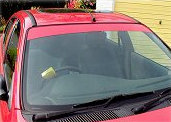
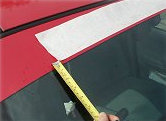
Measure down to the desired height, and place a piece of masking tape etc. to mark the position, (on both sides.)
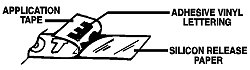
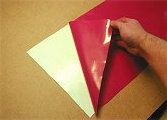
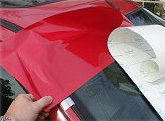
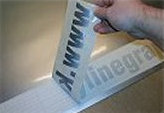
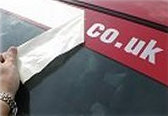
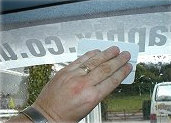
Carefully remove the plain vinyl strip by lifting up from the 'silicon release paper backing', trying to avoid finger marks. Larger sheets may need two people to work together. One to hold the vinyl by two corners, and the other to carefully peel back the white, glossy silicon backing paper. When it's nearly all removed the second person should then take hold of the remaining two corners of the vinyl. It can now be taken over to the car window, keeping it taut as you go, and avoiding fabrics, clothing etc., otherwise dust and fluff can be attracted to the static of the vinyl.
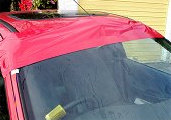
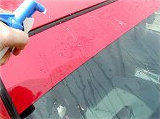
Place it on the moistened glass and slide it into position, lining it up with the pieces of masking tape.
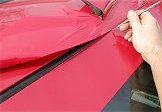
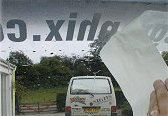
Once you are happy with the positioning, moisten the vinyl with water. Now you can start to flatten it to the surface using a plastic squeegee, firm credit card or a cloth. It may help if you hold the vinyl very slightly away from the surface as you proceed. (Note: If any roof aerials are obstructing, carefully cut a slit in the vinyl using a craft-knife.)
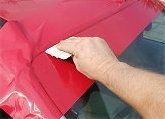
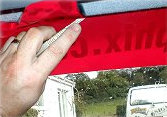
Working from the centre outwards, press down the vinyl pushing the water/air out towards the edges. Try to avoid letting the vinyl slide about as you are working. Carefully press the vinyl into the edges of the rubber trim with either the plastic squeegee or your finger nail.
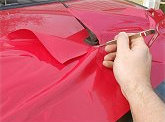
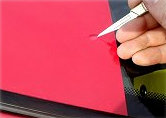
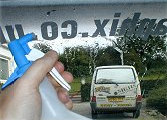
Carefully trim off any excess vinyl with a craft-knife or scalpel etc. (Try to avoid the blade from slipping and cutting into the window rubber trim.) Then re-flatten any areas if needed.
Once fitted, check for any water/air bubbles. If they won't push out, use a pin or scalpel blade to carefully pop them, then squeeze out the water/air. (Note: It's always best to prick one edge of the bubble, rather than the centre. You can then push the water/air out towards the pinhole.)
That's the actual vinyl strip finished. If there is any lettering to be fitted on top, proceed to the next stage:
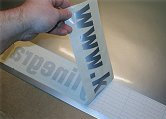
Moisten the sun visor strip, if required, and then carefully remove the vinyl graphics by lifting up the 'application tape' from the 'silicon release paper backing', (making sure that all the vinyl decals are lifted up with it), avoiding finger marks on the vinyl itself. Larger graphics may need two people to work together. One to hold the application tape/graphics by two corners, and the other to carefully peel back the white, glossy silicon backing paper. When it's nearly all removed the second person should then take hold of the remaining two corners of the tape/graphics. It can now be taken over to the vehicle, keeping it taut as you go, and avoiding fabrics, clothing etc., otherwise dust and fluff can be attracted to the static of the vinyl.
(Note: If any parts of the graphic refuses to lift, simply place the whole graphic on a firm surface and rub over the 'application tape' with your finger nail to press the section back against the silicon paper.
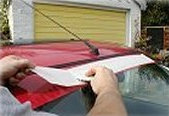
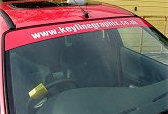
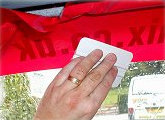
Tack the graphics gently onto the visor strip, using a tape measure at this point if required. If it needs repositioning, quickly pull it off and try again.
Once you are happy with the positioning, start to flatten it to the surface using a plastic squeegee, firm credit card or a cloth. It may help if you hold the vinyl slightly away from the surface as you proceed. Working from the centre outwards, press down the vinyl pushing the water/air out towards the edges. If using the 'wet' method, try to avoid letting the vinyl slide about as you are working.
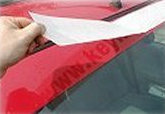
If fitted dry, the application tape can now be carefully removed by peeling away from the panel at 180 degrees, (flat on itself.) Note: If fitted using the 'wet application' method, you may need to wait for quite a while before removing the application tape. (It is impossible to give a precise timescale as no two situations are the same. Cold temperatures, inticacy of the design, and even the brand /concentration of any added washing-up liquid can all have an effect on the drying-time. It's best if you can check every so often to see if the application tape can be carefully removed. If the graphics have not yet adhered to the surface, then it will need to be left longer.)
Once fitted, check for any water/air bubbles. If they won't push out, use a pin or scalpel blade to carefully pop them, then squeeze out the water/air. (Note: It's always best to prick one edge of the bubble, rather than the centre. You can then push the water/air out towards the pinhole.)
Tack the graphics gently onto the glass, using a tape measure at this point if required. If it needs repositioning, quickly pull it off and try again.
If a coloured strip is also to be later fitted, remember when positioning the lettering that there will need to be enough space allowed for the vinyl strip to go over the top. (So, for instance, if you have a 6" [150mm] deep strip to be fitted and 4" [100mm] lettering, then you will need to make sure that there is approx 1" [25mm] top and bottom of the letters to get everything looking equal.)
Once you are happy with the positioning, start to flatten it to the glass using a plastic squeegee, firm credit card or a cloth. It may help if you hold the vinyl slightly away from the surface as you proceed. Working from the centre outwards, press down the vinyl pushing the water/air out towards the edges. If using the 'wet' method, try to avoid letting the vinyl slide about as you are working.
If fitted dry, the application tape can now be carefully removed by peeling away from the panel at 180 degrees, (flat on itself.) Note: If fitted using the 'wet application' method, you may need to wait for quite a while before removing the application tape. (It is impossible to give a precise timescale as no two situations are the same. Cold temperatures, inticacy of the design, and even the brand /concentration of any added washing-up liquid can all have an affect on the drying-time. It's best if you can check every so often to see if the application tape can be carefully removed. If the graphics have not yet adhered to the glass, then it will need to be left longer.)
That's the actual vinyl lettering finished. If there is any coloured strip to be fitted on top, proceed to the next stage:
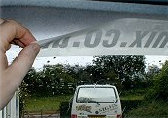
Moisten the graphics/glass area with water and then carefully remove the plain vinyl by lifting up from the 'silicon release paper backing', avoiding finger marks. Larger sheets may need two people to work together. One to hold the vinyl by two corners, and the other to carefully peel back the white, glossy silicon backing paper. When it's nearly all removed the second person should then take hold of the remaining two corners of the vinyl. It can now be taken over to the car window, keeping it taut as you go, and avoiding fabrics, clothing etc., otherwise dust and fluff can be attracted to the static of the vinyl.
Place it onto the moistened glass, (over the top of any pre-fitted lettering), and guide into position, using a tape measure at this point if required.
Once you are happy with the positioning, start to flatten it to the surface using a plastic squeegee, firm credit card or a cloth. It may help if you hold the vinyl slightly away from the surface as you proceed. (Note: If the rear-view mirror is obstructing, carefully use a craft-knife to cut a slit in the vinyl, then work/trim around it.)
Working from the centre outwards, press down the vinyl pushing the water/air out towards the edges. Try to avoid letting the vinyl slide about as you are working. Carefully press the vinyl into the edges of the interior rubber trim with either the plastic squeegee or your finger nail.
Carefully trim off any excess vinyl with a craft-knife or scalpel etc., (trying to avoid the blade from slipping and cutting into the window rubber trim.) Then re-flatten any areas if needed.
Once fitted, check for any water/air bubbles. If they won't push out, use a pin or scalpel blade to carefully pop them, then squeeze out the water/air. (Note: It's always best to prick one edge of the bubble, rather than the centre. You can then push the water/air out towards the pinhole.)
Job done!
Notes on removal of old self-adhesive vinyl:
Use an electric heat gun or hot hair dryer to gently warm the vinyl to be removed, taking care not to overheat any glass or painted surfaces etc. Carefully lift one corner of the vinyl, using a blade or window-scraper etc., and peel away the vinyl. Repeat on all required sections until completely removed. Any slight glue residue left behind can easily be removed using a 'Tar and Glue Remover', (which is available from most car accessory shops), or white spirit.
Important: Please take care when using the extremely hot heat guns, especially where glass, paintwork and other similar surfaces are concerned. They are quite safe and efficient to use, providing care is taken. Always hold the heat gun 'well away' from the surface, and your own hands, while you work. Just enough warmth to allow the vinyl to be softened is all that is necessary. Always handle heat guns with care and keep them away from children. Also always allow them time to cool down afterwards before storing away.
These instructions, as well as any others on this site, are merely intended as a guide to fitting our various products. Although we endeavour to be as efficient as possible with our instructions, and include as many details as we can, we cannot be held responsible for any problems, damages or indeed injuries, which might occur. As with all DIY projects, the person or persons carrying out the work is/are held responsible.
[Terms
and Conditions]